
How to Install Solar Panels on Your RV: A Basic Installation Guide
The Advantage of Installing Solar Panels on Your RV?
Most of the time, if you are looking to install solar panels on your RV, you’re an avid RV enthusiast looking to go off-grid. Maybe you just want to reduce your carbon footprint. Installing solar panels on your RV can be a game-changer.
I was super excited to get our RV solar system up and running.
Solar power on your RV provides you with a sustainable power source. It also offers the freedom to explore remote destinations without worrying about hookups or running out of power.
RV solar panels don’t make any noise when they are producing power. They don’t produce any fumes while producing power. Solar panels require very little maintenance. They only need a cleaning every now and then, depending on the areas you are camping.
In this beginners guide to RV solar, we’ll walk you through the step-by-step process of how to install solar panels on your RV. From mounting to wiring and a few things you’ll need in between.
The Basic Steps to Install Solar Panels on Your RV
- Measure available space on your RV roof
- Mount RV solar panels on your roof
- Run wires into RV
- Install RV solar charge controller
- Attach wires from solar charge controller to battery bank
- Attach wires from RV solar panels to RV solar charge controller
Before you do anything you’re going to have to get out a measuring tape and climb up on the roof of your RV. You need to know if you even have room to install solar panels on your RV.
Before You Install Solar Panels on Your RV: Make Sure You Measure Up
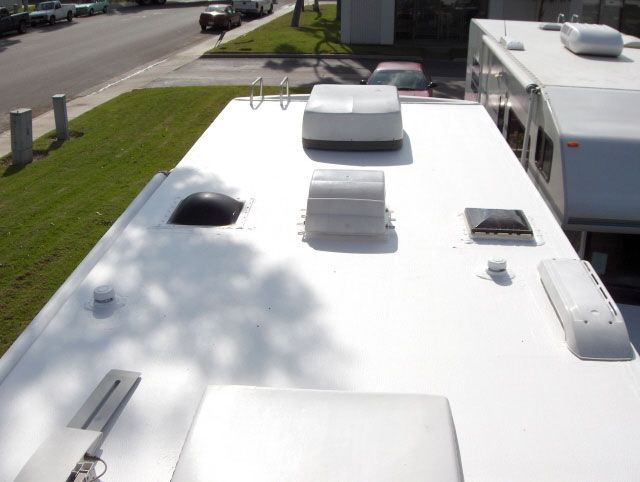
You need to decide how much of that valuable rooftop real estate you are willing to use for solar.
I wanted to put as many solar panels on my roof as I could fit. I still wanted to comfortably walk around to inspect and maintain the roof.
We are working on an RV Solar Calculator to help you calculate your solar needs faster. You will enter some basic information about the appliances you want to use in your RV. It will help you understand the electrical requirements of your RV solar system and what some of the required components might be.
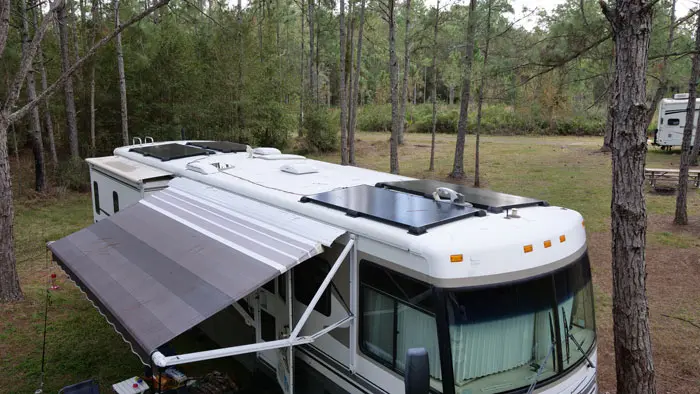
How To Mount Solar Panels On RV Roof
Before you begin the installation process, you’ll need to decide how you want to secure your solar panels to the roof of your RV.
We used screws to mount our RV solar panels, but that isn’t your only option. Screws are extremely secure, but you need to remember that your RV roof is very thin. There is a chance the wrong screw could pull out. We have had our RV solar panels on our roof for over 5 years now without any problems whatsoever. We used a combination of screws and adhesive.
That brings us to the second method of mounting RV solar panels to your roof. Adhesives. Some people say that adhesives are a sleeker option and more aerodynamic. I will maybe give them sleeker, but as far as aerodynamics, your RV roof has got so much going on I don’t personally think it makes that much difference.
Whichever method you choose, it is super important that you make sure the panels are securely attached to withstand wind and weather conditions.
Rigid Panels vs Flexible Panels
The choice you make here will also determine the mounting options of your RV solar panels.
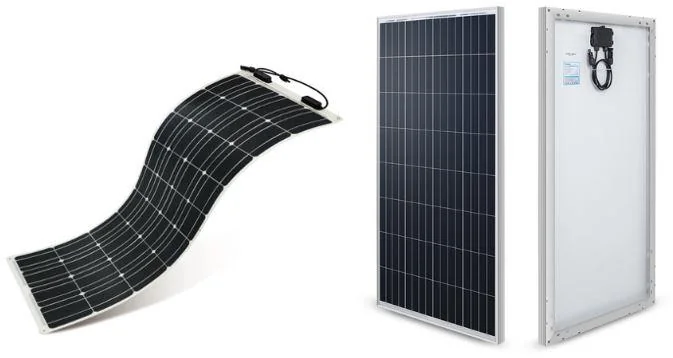
At first glance it may seem like a better choice to install flexible RV solar panels because they are more lightweight, conform to the shape of an RVs curved roof better and have a lower profile for wind.
The problem is that flexible solar panels tend to be less efficient.
Top of the line solar panels are at most up to 35% efficient. A flexible RV solar panel will likely be in the 7-15% range.
This means you will need more flexible RV solar panels to get the same amount of power as a regular solar panel.
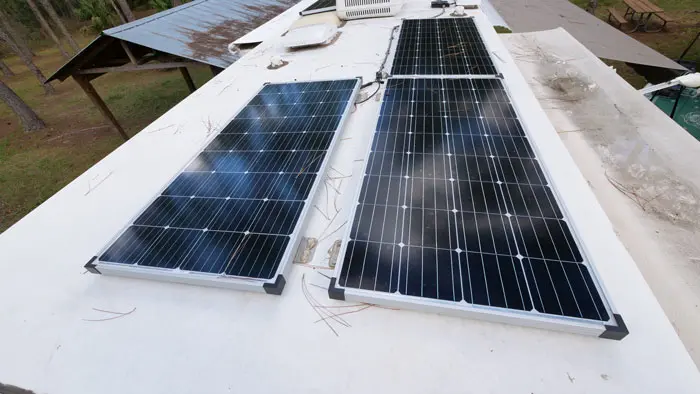
Mounting Your RV Solar Panels
You want to carefully mark the location of your solar panels. You don’t want to be moving them around especially if you’ve already drilled holes in your RV roof.
The amount of real estate you have on your RV roof will determine how much solar you can put on your RV.
If you decide to go with a flexible solar panel, some will glue down directly to the roof of your RV with double stick tape, some with epoxy and others will screw down.
When it comes to mounting rigid RV solar panels, you have a few options to consider. They mount fairly flat on your RV roof using a variety of flat brackets or you can use tilt brackets so they get more optimal sun exposure.

One of the most popular mounting brackets is a simple “Z” bracket like the BougeRV 8 Units Solar Panel Mounting Bracket named because it is shaped like the letter “z”. Easy to install and gets the job done.
These are the ones we used and they have worked great so far.

Another popular option are “no drill” mounts. The Solar Panel Mounting Brackets 7PCS Solar Panel Rv Roof Mounting Brackets Kit are an example of a no drill mount.
They come in white or black.

You use silicone adhesive or 3M VHB mounting tape to hold them down to your RV roof. I was hesitant about just using tape to hold down an RV solar panel, but my friend Kevin used it and once that 3M VHB tape touched the roof, you were not moving that panel.
Make sure you have them properly positioned before they hit the roof!
Tilt mounts are ideal for maximizing energy production, especially during winter months when the sun is lower in the sky.

Renogy makes 28in Adjustable Solar Panel Mount Brackets to help you get that extra solar production.
If you move around a lot you might find tilt brackets to be kind of a pain.
How to Wire Your RV Solar Panels
A simple way to look at wiring your RV solar panels is “series for voltage” and “parallel for amps.”
Let me explain.
When wiring multiple solar panels together, you have several options for configuration, each with its own advantages. You can connect panels in series to increase voltage or in parallel to increase amperage, or use a combination of both for optimal performance.
RV Solar Panels Connected in Series
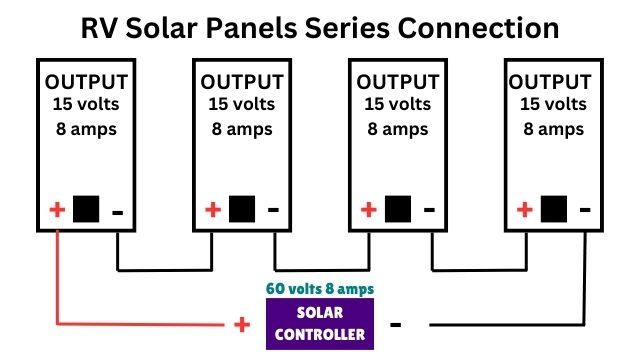
Connecting RV solar panels in series is the same way you connect batteries in series.
The first solar panel’s positive terminal goes straight to the RV solar controller. The negative of that panel goes to the positive terminal on the next panel. You continue to do that until the final solar panel’s negative terminal will connect back to the solar controller.
Wiring your RV solar panels in “series” it will increase the voltage, but keep the amperage the same, as shown in the image above.
RV Solar Panels Connected in Parallel
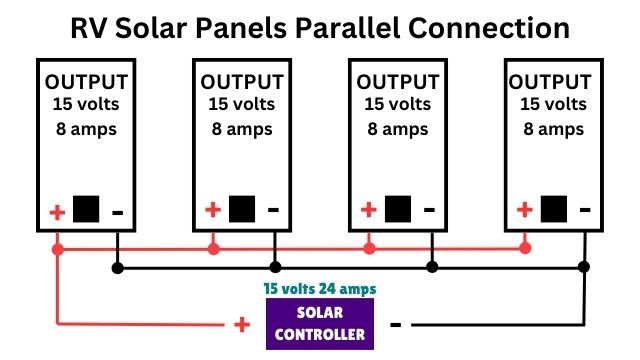
Connecting RV solar panels in parallel is also done in the same way you connect batteries in parallel.
Each individual solar panel’s positive and negative terminal tie directly into the RV solar controller. You can attach them directly at the solar controller or through the use of a busbar for larger installations.
For a larger solar array, all the negative wires, which are usually black, connect to a NEGATIVE busbar and then the busbar attaches to the RV solar controller negative terminal. The same works for the positive side.
When you wire your RV solar panels in “parallel” you will keep the voltage the same and increase the amperage, as shown in the image above.
RV Solar Panels Combined in Series-Parallel
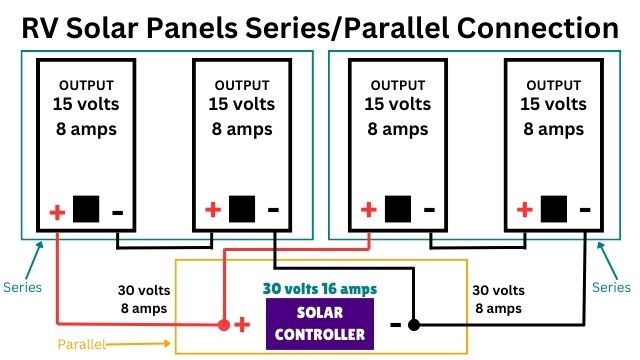
When connecting RV solar panels in a series/parallel system, you would use the methods above to connect two sets of your panels in series and then parallel connect the two sets of solar panels to your RV solar controller.
Just like with batteries you can’t connect endless numbers of solar panels in series or parallel without consequences. That is beyond the scope of this basic article.
When you wire your RV solar panels with both a series connection and a parallel connection you will get the best of both worlds.
There are many reasons for why you would want to wire your solar panels in series, parallel or a combination of both, but that is way beyond the scope of a simple installation guide.
Check the FAQ section below for more information.
Getting Wires From RV Solar Panels to Inside RV
Routing wires from your solar panels to your charge controller and batteries can be tricky. You have two options with variations of each option.
Fridge Vent Entry
One convenient and very popular option is to utilize the fridge vent on your RV.
This existing opening provides a discreet and protected pathway for wires, minimizing the need for drilling additional holes in your roof.
Existing or Custom Holes
You may be able to find other holes that are already making their way inside your RV and use those to bring in the wiring from your solar panels.
If you can’t find an existing route into your RV you’re going to have to drill.
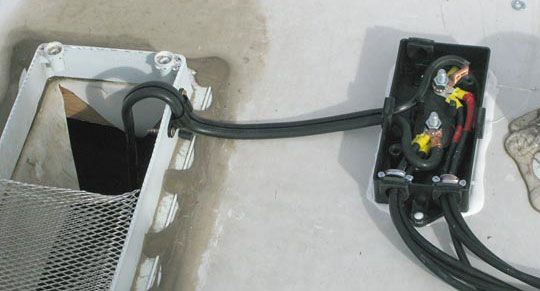
When you decide that making your own holes are the best way to get your cables inside your RV there are solar accessories that can help you.

One RV accessory you can use is a BougeRV White Solar Double Cable Entry Gland Box. This will allow you to make a hole in your RV roof with a hole saw and then be able to cover it up and run your cables neatly into the hole without rubbing the cables on the opening.

Another great way is to use a gland box that has MC4 connectors right on it and that’s the SolarEnz Solar Weatherproof Double Cable Entry Gland Entry Housing.
Whatever way you decide to get your cables into your RV you need to make sure they are extremely well sealed to prevent water from entering your RV.
Once your cables are inside it’s time to install your RV solar charge controller.
RV Solar Charge Controller: Safety and Monitoring RV Solar
A solar charge controller is an essential component of any RV solar power system. It regulates the voltage and current coming from your solar panels to prevent overcharging your batteries.

When installing your charge controller, make sure it’s easily accessible and mounted in a well-ventilated area to prevent overheating.
You’ll want your RV solar charge controller close to your batteries to keep the wire runs and voltage drop to a minimum.
Companies like Victron offer RV solar controllers with bluetooth so you can monitor your RV solar system while sipping your morning tea.
NOTE: NEVER HOOK SOLAR PANELS DIRECTLY TO YOUR RV BATTERIES
A direct connection could cause an overload, overheating and in worse case, a fire.
Once your RV solar charge controller is in place, it’s time to connect it to your RV’s battery bank.
Follow the manufacturer’s instructions carefully, ensuring proper polarity and wire sizing to prevent any safety hazards.
Double-check all connections before powering up your system to avoid damaging your equipment.
You will want to make sure your solar charge controller is appropriately sized to handle the incoming voltage and amperage from your solar panels. It will also need to provide the proper outgoing voltage to your battery bank.
Final Checks Before Connecting RV Solar Panels, Solar Charge Controller and Batteries.
You will need to have appropriately sized fuses, breakers and cutoff switches to cut power in case of an emergency.
Breakers and fuses will vary greatly depending on the size of your system. Having cutoff switches will make it easier to perform maintenance or make future changes to your RV solar system.
You should connect your batteries to the solar charger first. This will alow your charge controller to measure the load from your battery bank.
Then connect the RV solar panels to the charge controller and you are now sending power to your batteries.
You’ve Installed Solar Panels On Your RV: Now What?
You now have a basic RV solar system.
- The RV solar panels will bring power in when the sun is shining.
- The RV solar charge controller takes that power and makes it usable for battery charging or running appropriate voltage appliances.
- Your battery bank stores that power to be used later.
How can you make the best use of your RV solar system?
Add an RV Inverter to Power 120v RV Appliances
Your RV has two different electrical systems and your RV solar system is only addressing the 12v side of your system at this time. The power from your solar allows you to keep your lights on at night and power any 12v appliances.

To make the most of your RV solar power system, consider adding an RV inverter to convert the DC power from your batteries into AC power for running household appliances and electronics in your RV.
You will want to choose an RV inverter with sufficient wattage to meet your energy needs and install it in a well-ventilated area away from moisture and heat.
When you consider an average microwave is 1,000-1,500 watts and a coffee maker can be 1,000-1,500 watts, you will probably want to start with at least a 2,000 watt RV inverter. If you think you might want to use them both at once, 3,000 watts plus will work better for you.
For an even better solution you could use an RV inverter charger, that can operate both as an inverter to change DC power to AC power for you 120v appliances and act as a RV battery charger when you’re plugged in at a campground. We have an article on the 7 Best RV Inverter Chargers for your RV.
Consider a Solar Generator for Your RV

If you’re not ready to commit to a full RV solar panel installation, a solar generator can be a convenient alternative.
These portable devices harness solar energy to provide on-the-go power for camping trips, outdoor events, or emergency situations, offering versatility and peace of mind wherever you go.
With this guide, you’re well-equipped to embark on your DIY RV solar panel installation journey and enjoy the benefits of sustainable and reliable power on your RV adventures. Safe travels!
Be sure to check out some of our other RV Solar Articles
For more tips and inspiration on RV living and solar power, check out these related articles:
– “RV Inverter: 12 Amazing Conveniences An Inverter Gives You While Camping“
– “Can You Run an RV on Solar Power in 2024?“
– “Top 7 Best RV Inverter Charger in 2024“
You can debate the series parallel thing all day, but when it comes to power production, it is better to wire RV solar panels in parallel rather than series. Parallel solar panel wiring allows each solar panel to operate independently. If one panel has an issue the others aren’t affected.
Wiring in series does give you more voltage and helps you meet solar charger voltage requirements. If you have even a small amount of shade on the corner of a solar panel it will affect your entire system.
To optimize the electricity produced by your RV solar system without exceeding your solar charge controller voltage ratings, you may have to use use a combination of series and parallel wiring connections.
1. Measure available space on your RV roof
2. Mount RV solar panels on your roof
3. Run wires into RV
4. Install RV solar charge controller
5. Attach wires from solar charge controller to battery bank
6. Attach wires from RV solar panels to RV solar charge controller
Unfortunately this is one of those, “It depends” questions. It depends on what your daily power consumption is going to be. You need to calculate your total daily watts and go from there. You can get an approximate by taking your total consumption, let’s say 4,000 watts and divide by hours of sun. Average is 5. So, 4,000/5= 800 watts. The type and size of your battery bank also plays a role.
You can’t really plug a solar panel directly into your RV without going through some sort of solar charge controller. The solar panels go to a solar charge controller, the solar charge controller regulates the voltage to the battery bank and the battery bank supplies power to your RV through an RV inverter.
Yes, you can, but the price of the equipment required may be prohibitive. RV air conditioners are extreme power hogs and require a lot of energy to run. Day time use is not as much an issue as overnight use. The battery bank required to run your RV air conditioners overnight will be quite large. Probably 1,000Ah or more.
You will be right on the edge of the capacity of a 2,000 watt inverter when powering an RV air conditioner. The initial surge is going to be your biggest hurdle even if your RV air conditioner has a soft start module. And then you have to worry about being able to run other appliances, as well. If your plan is to run your RV air conditioner you should go to a bigger RV inverter.
You should be able to run your RV air conditioner with a 3,000 watt inverter. Again, the initial surge is going to be your biggest hurdle, even if your air conditioner has a soft start module. If you want to run your RV air conditioner and other appliances, as well, you should consider going to a larger RV inverter.